OverviewVivantio offers a Single Sign On feature to allow both your Technicians and End Users to be authenticated against Active Directory (or other custom authorities). Rather than providing an email address and password to log in, Vivantio redirects the Technician or End User to an alternative authority, which authenticates the user and then redirects them back to Vivantio with a secure access token. This all happens transparently to the Technician / End User. Single Sign On is available for both SaaS and On Premise customers, and works the same way regardless of environment. Single Sign On doesn't replace the email / password login - each Technician / End User will continue to have the ability to log in via email / password. ArchitectureThe diagram below shows a high level view of how Single Sign On works. For more details about the underlying methodology, and details on security considerations, please contact our support team. 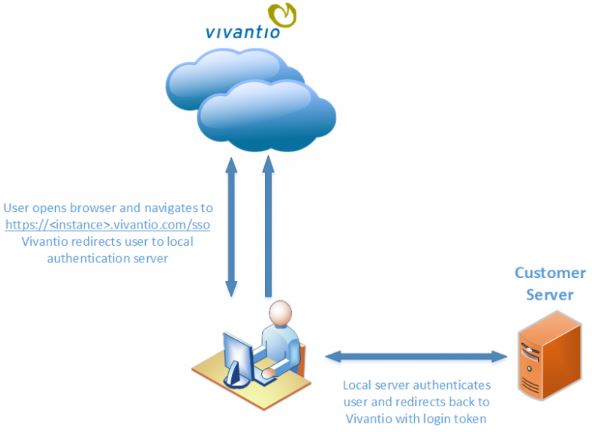
Single Sign On via Active Directory
The rest of the instructions here - and the downloadable sample pages in the Vivantio Admin Area - refer to using Active Directory as the local authentication authority. The instructions also assume that your Technicians and End Users are in the same Active Directory Domain. For information about Single Sign On from other authentication sources, or for authenticating users from multiple different domains, contact our support team. Pre-requisitesTo set up Single Sign On for Active Directory, you will need:
•The Active Directory Account Names for your Technicians / End Users
These should be set in the Users and Contacts/Callers section of Vivantio respectively - see below for more details
•A web server to function as your local authentication server. A website will be installed on this server, which you'll need to configure a DNS name for - you'll add this into Vivantio later (alternatively you can use the server name). The server must also:
- Be able to connect to Active Directory, so that it can authenticate your users - Be accessible to your Technicians / End Users, so that when Vivantio redirects them to it, they can reach it Vivantio Admin Configuration for Technicians
Local Authentication URL
In the Vivantio Admin Area, navigate to: Admin > Setup > User Management > Single Sign On
On this page, you'll be given the option to Enable Single Sign On.
Clicking that button will show you a dialog similar to the below: 
On this dialog, you should enter the DNS name you are going to use for your local authentication website. You need to include the protocol as well - https:// if you intend to use SSL, otherwise http://. For most customers, SSL isn't necessary, as the local authentication website will only be accessible internally. The Vivantio Support team can provide further advice on this based on your specific requirements.
After entering your local authentication URL and saving, you'll be presented with options to download sample authentication pages. If you're only implementing Single Sign On for your technicians, you can download these pages now - they'll be used later on. If you're implementing Single Sign On for End Users as well, don't download these pages yet - you can download them after configuring the End User Single Sign On. Technician Account NamesIn the Vivantio Admin Area, navigate to: Admin > Setup > User Management > Users
On this page, you'll see a list of your Technicians. When you Add or Edit a Technician, you're able to specify their Domain Login Name: 
If you're using the sample pages from the admin area, you should specify the account name *without* the domain part. For example, if your domain login name is DOMAIN\User, you should just enter User. If you're using multiple domains with conflicting user accounts, contact our support team for further instructions on modifying the sample pages to include the domain name.
You'll need to specify the Domain Login Name for each user that will use Single Sign On. Vivantio Admin Configuration for End UsersSetup for End Users is very similar to the setup for Technicians. If you have multiple Self Service Portals, you'll need to repeat the steps below for each Portal. Local Authentication URLIn the Vivantio Admin Area, navigate to: Admin > Self Service > Features > Single Sign On On this page, you'll be given the option to Enable Single Sign On. Clicking that button will show you a dialog similar to the below: 
(This is very similar to the screen used when enabling Single Sign On for Technicians). As before, after entering your local authentication URL and saving, you'll be presented with options to download sample authentication pages. If you didn't download these before, you can download them now. End User Account NamesIn the Vivantio Operational Area, navigate to your Contacts / Callers area (the exact label used may vary). Similar to when adding a Technician, when adding a Contact / Caller, you're able to specify their Domain Login Name: 
Make sure that you also check the "Login Enabled" box on the Self Service tab on this page. If you're using Roles and Permissions in Self Service, then you will also need to choose which Role the Contact / Caller is in for each Portal.
If you're using the Vivantio Integration Services Component for Active Directory Synchronization, then the Domain Login Name can be automatically filled in for your End Users.
Local Authentication Server ConfigurationAt this point, the Vivantio side of the configuration is complete, and you need to set up your local web server. The Vivantio Single Sign On Sample Pages are available in two languages: •ASP.Net*PHP You aren't limited to using just these though - you can use any language / web server you want, as long as it can authenticate your users and redirect them back to Vivantio - contact Vivantio Support to see if additional samples are available in your language of choice / for further guidance. The rest of this guide will assume you're using ASP.Net and installing on Internet Information Services. Internet Information ServicesThe below information is a general guideline only and may not be applicable in all circumstances / server configurations. Contact your in-house IT support team for further details. Extract the Sample Pages downloaded earlier into a folder on your file system - for example, C:\inetpub\VivantioSingleSignOn Set up a new website in IIS pointing at that directory, and using the appropriate DNS name set earlier
Disable Anonymous Authentication and enable Windows Authentication If you're using the Sample Pages downloaded earlier, that's the only configuration required - everything else is already configured for you. UsageOnce all the above steps have been completed, your users can log in to the Technician Application at:
https://<instance>.vivantio.com/sso
And the Self Service Portal at:
https://<instance>.selfservice.vivantio.com/sso
(Please note that individual customer URLs may vary).
MaintenanceUpdating the Local Authentication URL If you move your local authentication website to a different server, you will need to update the configuration in Vivantio. This can be done in the Admin Area under: Admin > Setup > User Management > Single Sign On
or
Admin > Self Service > Features > Single Sign On Resetting your Shared KeyWARNING: Resetting your Shared Key will prevent Single Sign On from working until your local authentication website is updated. You should only do this if you believe your key to be compromised. The Shared Key for Single Sign On is very important: it's used to verify that Single Sign On requests came from your server. You should never distribute the Shared Key and you should take steps to ensure that no-one has access to your local authentication web server, from which they could obtain the key.
In the event you believe your Shared Key to be compromised, you can reset it in the Admin Area under: Admin > Setup > User Management > Single Sign On
or
Admin > Self Service > Features > Single Sign OnThis operation is permanent and irreversible. Immediately after doing so, you will need to re-download and re-deploy the Sample Pages. For further information, contact Vivantio Support. Single Sign on in the Self Service Portal.You are able to include Return URLs in Single Sign On links for the Self Service Portal. For example, the below address could be used for a link in an email template:
https://customer.selfservice.vivantio.com/sso?returnurl=/Ticket/Detail/Template:Ticket.id
A customer using SSO clicking that link would be automatically signed in and taken to the ticket.
| 
